> For clean Markdown of any page, append .md to the page URL.
> For a complete documentation index, see https://docs.stereolabs.com/docs/integrations/unity/llms.txt.
> For AI client integration (Claude Code, Cursor, etc.), connect to the MCP server at https://docs.stereolabs.com/_mcp/server.
# Getting Started with Unity and ZED
The [ZED Unity plugin](https://github.com/stereolabs/zed-unity/) allows developers to build interactive experiences with a first or third-person view. It provides access to body tracking, stereo video passthrough, depth sensing, positional tracking, and spatial mapping features within Unity. Examples of applications made possible by the ZED plugin include:
* Building [Mixed Reality](/docs/integrations/unity/mixed-reality-capture/) (AR/MR) interactive experiences where real and virtual objects blend.
* Displaying [Passthrough AR](/docs/integrations/unity/ar-video-passthrough/) experiences in an Oculus Rift or HTC Vive.
* Capturing VR applications from a third-person point of view in front of a [Green Screen](/docs/integrations/unity/green-screen-vr-capture/).
## ZED Plugin for Unity
The [ZED Unity plugin](https://github.com/stereolabs/zed-unity/) is available as a Unity package through the Package Manager. It includes assets, scripts, and sample scenes to assist with development. Many of its core features, such as mixed reality, take minutes to implement thanks to its prefabs.
> **Note**
>
> Before release 4.1.1, the plugin was available as a `.unitypackage` file to install in your project. These versions, made for the ZED SDK up to 4.1, are available on the [Releases](https://github.com/stereolabs/zed-unity/releases) page.
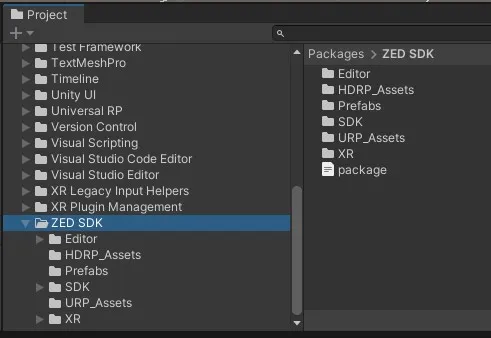
The package contains the following subdirectories:
* **XR**: Configuration assets for XR management.
* **Editor**: Contains scripts to add functionality to the Unity editor interface.
* **Prefabs**: Contains the main prefabs to add a ZED camera to a scene: ZED\_Rig\_Mono and ZED\_Rig\_Stereo.
* **SDK**: Contains files and resources to interface the ZED SDK with Unity.
> **Note**
>
> The samples can be installed individually from the Package Manager.
### Plugin Requirements
| | | |
| :-------------------------: | :-----------------------------------------------------------------: | :---------------------------------------------------------------------------------------------------------------------------------------------------------------------: |
| **ZED Camera** | **GPU** | **AR/VR** |
| Any ZED camera | CUDA 10.2 capability or higher GTX 1060 or higher is recommended | OpenVR, Oculus VR or OpenXR |
| **OS** | **Unity Version** | **ZED SDK Version** |
| Windows 10/11 Ubuntu 20/22 | [Unity 2021.3](https://unity.com/products/unity-personal) and newer | [ZED SDK 4.1](https://www.stereolabs.com/developers/release/) *Previous versions are supported by [previous plugins](https://github.com/stereolabs/zed-unity/releases)* |
## How to Get Started
To develop applications in Unity with your ZED, you'll need the following things:
* Download and install the [latest ZED SDK](https://www.stereolabs.com/developers/release/).
* Install the ZED Unity plugin and its samples through Unity's Package Manager, as described in [Step 3](#step-3-import-the-plugin).
* Read the [Key Concepts](/docs/integrations/unity/key-concepts) and [Build Your First AR/MR App](/docs/integrations/unity/build-your-first-ar-mr-application) guides to get started.
* Explore the [Samples](/docs/integrations/unity/sample-scenes) included in the plugin.
* The [Main Scripts](/docs/integrations/unity/key-concepts#key-scripts) part of the documentation introduces the plugin's important scripts and their parameters.
### Step 1: Installation
* Install the [**ZED SDK**](https://www.stereolabs.com/developers/release/) and restart your computer.
### Step 2 (optional): Using the Universal Render Pipeline or the High-Definition Render Pipeline
To use URP or HDRP, you must either create a new Project that uses one of them or upgrade an existing one.
#### Create a new URP/HDRP Project
* Open Unity Hub and Click the **New** Button.
* In the Template section, select the **Universal 3D** or **High Definition 3D** template.
* Click **Create**. Unity automatically installs the necessary packages and sets up your project to use them.
* [Import the ZED plugin.](#step-3-import-the-plugin)
#### Upgrade to URP
URP upgrade instructions
* Go to **Window** -> **Package Manager**. Find and install **Universal RP**.
Now you need to configure the URP. To do this, you have to create a Scriptable Render Pipeline Asset.
* Right-click in the Project window and select **Create** -> **Rendering** -> **URP Asset (with Universal Renderer)**.
You can also go to **Assets** -> **Create** -> **Rendering** -> **URP Asset (with Universal Renderer)**.
Add this Render Pipeline Asset to your Graphics settings.
* Go to **Edit** -> **Project Settings** -> **Graphics**. In the **Scriptable Render Pipeline Settings**, add the Universal Render Pipeline Asset you just created.
Upgrade all the materials to URP:
* Go to **Window** -> **Rendering** -> **Render Pipeline Converter**, select **Built-in to URP** and convert all materials.
These changes cannot be undone. Back up your project before you upgrade it.
For more details on how to set up URP, see the [Universal Render Pipeline Documentation](https://docs.unity3d.com/Packages/com.unity.render-pipelines.universal@17.0/manual/index.html).
#### Upgrade to HDRP
HDRP upgrade instructions
* Go to **Window** -> **Package Manager**. Find and install **High Definition RP**.
* To set up your project, use the **HDRP Wizard** available at **Window -> Rendering -> HDRP Wizard**.
* In the **HDRP** section, click the **Fix All** button. HDRP is now set up in your project.
* You might also need to click on **Convert All Built-in Materials to HDRP** to convert your project's materials to HDRP.
For more details on how to set up HDRP, see the [High Definition Render Pipeline Documentation](https://docs.unity3d.com/Packages/com.unity.render-pipelines.high-definition@17.0/manual/index.html).
### Step 3: Import the Plugin
* Open your project.
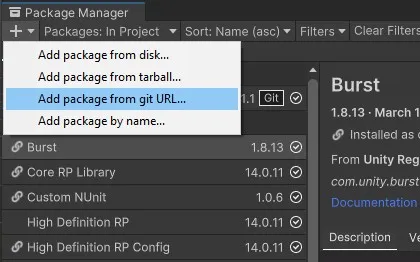
* Go to **Window** -> **Package Manager**. Click the **"+"** button at the top left and select "Add package from git URL...".
* Copy this URL into the field and hit Add:
```
https://github.com/stereolabs/zed-unity.git?path=/ZEDCamera/Assets
```
* Wait for the package to install (it can take some time, depending on your connection)
* Install the samples you want to try out/use through the Package Manager
* Select the "ZED SDK" package
* Go to the "Samples" tab and import the samples you want.
* Also import the Assembly Definition, which can improve compile time and editor responsiveness at no cost.
> **Note**
>
> If you're using the URP or HDRP render pipelines, you also need to **Upgrade the materials** (**even if you created a URP/HDRP project before importing the plugin**).
>
> * **URP:** Go to `Window -> Rendering -> Render Pipeline Converter` and convert all materials from Built-In to URP. This is not reversible, so proceed with caution.
> * **HDRP:** Go to `Window -> Rendering -> HDRP Wizard` and convert all materials. This is not reversible, so proceed with caution.
> **Note**
>
> Some materials may appear pink even after upgrading the project's materials. They should work correctly at runtime, but in any case this can be fixed by assigning the corresponding "\*\_URP" material instead of the current one. To do so:
>
> * Select the GameObject with the pink material.
> * Scroll down to its material in the Inspector.
> * Click the three dots at the top right of the material component.
> * Click "Select Material": this should take you to the material asset in the Project window.
> * Next to the material should be its URP counterpart.
> * Assign the URP material by dragging it onto the GameObject.
### Step 4: Try it out
Navigate to `Assets/Samples/ZED SDK` and try out the [available samples](/docs/integrations/unity/sample-scenes)!
## Docs
- [Key Concepts & Scripts](https://docs.stereolabs.com/docs/integrations/unity/key-concepts.md)
- [How to Build Applications with Unity and ZED](https://docs.stereolabs.com/docs/integrations/unity/building-applications.md)
- [AR Video Passthrough with Unity](https://docs.stereolabs.com/docs/integrations/unity/ar-video-passthrough.md)
- [Build your first AR/MR App with Unity](https://docs.stereolabs.com/docs/integrations/unity/build-your-first-ar-mr-application.md)
- [Body Tracking](https://docs.stereolabs.com/docs/integrations/unity/body-tracking.md)
- [Environmental Mapping with Unity](https://docs.stereolabs.com/docs/integrations/unity/spatial-mapping.md)
- [Mixed Reality Capture with Unity](https://docs.stereolabs.com/docs/integrations/unity/mixed-reality-capture.md)
- [Object Detection](https://docs.stereolabs.com/docs/integrations/unity/object-detection.md)
- [AR Lighting and Shadows with Unity](https://docs.stereolabs.com/docs/integrations/unity/lighting-and-shadows.md)
- [Using Motion Controllers in AR](https://docs.stereolabs.com/docs/integrations/unity/motion-controllers-in-ar.md)
- [AR Object Placement with Unity](https://docs.stereolabs.com/docs/integrations/unity/object-placement.md)
- [Using OpenCV in Unity](https://docs.stereolabs.com/docs/integrations/unity/using-open-cv-with-unity.md)
- [Unity - Green Screen VR Capture](https://docs.stereolabs.com/docs/integrations/unity/green-screen-vr-capture.md)
- [Sample Scenes](https://docs.stereolabs.com/docs/integrations/unity/sample-scenes.md)