Adding Positional Tracking in ROS
The ZED ROS Wrapper packages are no longer maintained because ROS 1 reached end-of-life (EOL) on 2025-05-31 with the final Noetic release.
We recommend upgrading to ROS 2 to take advantage of the latest ZED SDK features for robotics applications.
Position with RViz
In this tutorial, you will learn in detail how to configure your own RViz session to see only the position data information that you require.
RViz provides plugins for visualizing the camera’s pose and its path over time.
Camera odometry
The Odometry plugin provides a clear visualization of the odometry of the camera (nav_msgs/Odometry) in the Map frame.
![]()
Key parameters:
Topic: Selects the odometry topic/zed/zed_node/odomUnreliable: Check this to reduce the latency of the messagesPosition toleranceandAngle tolerance: set both to0to be sure to visualize all positional dataKeep: Set to the number of messages to visualize at a timeShape: You can visualize odometry information as an arrow pointing in the direction of theXaxis, or as a threeAxesframe. Both shapes can be resized to your preference
As of ZED SDK v2.6, pose covariance is available if the spatial_memory parameter is set to false in the ZED launch file.
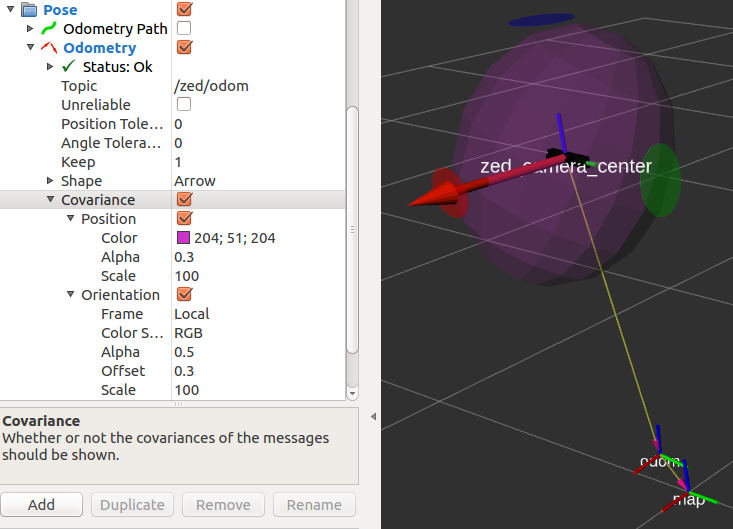
You can get a visual estimation of the covariance with the odometry plugin by checking the Covariance option.
The position covariance is visualized as an ellipsoid centered in the camera frame. The three orientation covariances are visualized as three 2D ellipses centered on the relative axis.
You can change the Scale factors to get a better visualization when the ellipsoid and the ellipses are too big (high covariance) or not visible (low covariance).
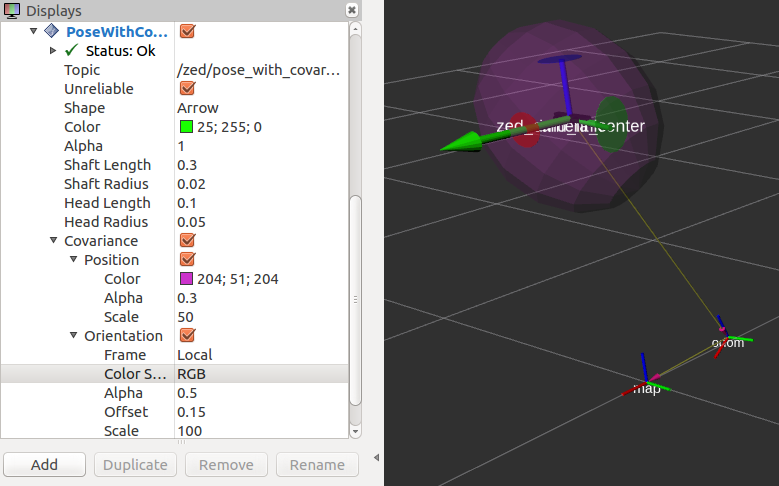
Camera pose
The Pose plugin provides a visualization of the position and orientation of the camera (geometry_msgs/PoseStamped) in the Map frame similar to the Odometry plugin, but the Keep parameter and the Covariance parameter are not available.
The Topic to be subscribed to is /zed/zed_node/pose.
![]()
Camera path
The ZED wrapper provides two different paths for the camera position and orientation:
/zed/zed_node/path_map: The history of the camera pose in Map frame/zed/zed_node/path_odom: The history of the odometry of the camera in Map frame
![]()
Above you can see both the Pose (green) and the Odometry (red) paths.
The odometry pose is calculated with a pure “visual odometry” algorithm as the sum of the movement from one step to the next. It is therefore affected by drift.
The camera pose is instead continuously fixed using the StereoLabs tracking algorithm that combines visual information, space memory information and if using a “ZED-M,” inertial information.
The parameters to be configured are analogous to the parameters seen above for the Pose and Odometry plugins.
Position subscribing in C++
In this tutorial, you will learn how to write a simple C++ node that subscribes to messages of type
geometry_msgs/PoseStamped and nav_msgs/Odometry to retrieve the position and the orientation of the ZED camera in the Map and in the Odometry frames.
Introduction
Use the following command to connect the ZED camera to the ROS network:
-
ZED:
-
ZED Mini:
-
ZED 2:
-
ZED 2i:
The ZED node starts to publish messages about its position in the network only if there is another node that subscribes to the relative topic.
The ZED wrapper publishes two kinds of positions:
odometry: The position is calculated as the sum of the movements relative to the previous position. Only pure visual odometry is used.pose: The position calculated relative to theworld map. Historical information about the environment and inertial data (if using a ZED-M) are fused to get a better 6 DoF pose.
The ROS wrapper follows ROS REP105 conventions.
Running the tutorial
If you properly followed the ROS Installation Guide, the executable of this tutorial has just been compiled and you can run the subscriber node using the following command:
If the ZED node is running and a ZED or ZED-M is connected or you have loaded an SVO file, you will receive the following stream of messages confirming that you are correctly subscribing to the ZED image topics:
If you move your camera by hand, you will see how the position and orientation are updated in real time, and how odom and pose drift apart from each other because the odom pose is pure odometry data and is not corrected.
The code
The code explained
The following is a brief explanation of the source code above.
The two callbacks are very similar; the only difference is that poseCallback receives messages of type geometry_msgs/PoseStampedand odomCallback receives messages of type nav_msgs/Odometry. These are similar but not identical.
However, the information extracted by the two topics is the same: camera position and camera orientation.
Extracting the position is straightforward since the data is stored in a vector of three floating-point elements.
Extracting the orientation is less straightforward as it is published as a quaternion vector. To convert the quaternion to a more readable form, we must first convert it to a 3x3 rotation matrix from which we can finally extract the three values for Roll, Pitch and Yaw in radians.
Finally, we can print the information received to the screen after converting the radian values to degrees.
The main function is very standard and is explained in detail in the “Talker/Listener” ROS tutorial.
It is important to note how the subscribers are defined:
A ros::Subscriber is a ROS object that listens on the network and waits for its own topic message to be available.
When a message is received, it executes the callback assigned to it.
In this tutorial, we declared two subscribers to the pose data:
- The subscriber to the topic
/zed/zed_node/odomcalls theodomCallbackfunction when it receives a message of typenav_msgs/Odometrythat matches that topic - The subscriber to the topic
/zed/zed_node/posecalls theposeCallbackfunction when it receives a message of typegeometry_msgs/PoseStampedthat matches that topic
Conclusion
The full source code of this tutorial is available on GitHub in the zed_tracking_sub_tutorial sub-package.
Along with the node source code, you can find the package.xml and CMakeLists.txt files that complete the tutorial package.