

How to Install ZED SDK on Linux
Download and Install the ZED SDK
The ZED SDK for Linux contains all the drivers and libraries that power your camera along with tools that let you test its features and settings.
- Is a GPU required? Yes. The ZED SDK requires an NVIDIA® GPU with Compute Capability 7.5 or higher, based on the Turing micro-architecture or more recent. The SDK cannot run on machines without a compatible NVIDIA® GPU, including for recording SVO files. See the recommended specifications for the complete requirements.
- Is CUDA required? Yes. If CUDA is not already present on your system, the ZED SDK installer offers to download and install it for you, so you do not need to install it beforehand. A compatible NVIDIA® GPU and driver must still be present for CUDA to work.
-
Download the ZED SDK for Linux.
-
Go to the folder where the installer has been downloaded.
-
If you don’t have it installed already, install
zstd. It will be needed for the installer to run. -
Add execution permission to the installer using the
chmod +xcommand. Make sure to replace the installer name with the version you downloaded. -
Run the ZED SDK installer.
-
At the beginning of the installation, the Software License will be displayed, hit
qafter reading it. -
During the installation, you might have to answer some questions about installing dependencies, tools, and samples. Type
yfor yes ornfor no, then hitEnter. HitEnterto pick the default option.
Once the installer finishes, the ZED SDK is installed in /usr/local/zed. If you plan to use Python, install the Python API next: the installer offers to do it for you, and you can also run the get_python_api.py script from /usr/local/zed at any time.
Installing in silent mode
The silent-mode installation allows you to install specific configurations of the ZED SDK. It removes any display or manual configuration options during the installation process.
The installer can be launched in silent mode with the -- silent option (with a space between -- and silent).
Installing Runtime version only
To install the ZED SDK without any static libraries, headers, tools, or samples, add the runtime_only option.
Installing SDK without checking CUDA
To install the ZED SDK without checking that CUDA is installed, add the skip_cuda option.
Installing SDK without Object Detection
To install the ZED SDK without the AI module (required for Object Detection, Body Tracking, and Neural Depth), add the skip_od_module option.
Without the AI module, image capture, SVO recording, and DEPTH_MODE::NONE remain available, while the NEURAL, NEURAL_LIGHT, and NEURAL_PLUS depth modes are not. Because SVO files store only raw images, depth can be computed later from these recordings on a system that has the AI module installed.
Installing SDK without Python Wrapper
To install the ZED SDK without the Python wrapper, add the skip_python option.
Installing SDK without sl_hub
To install the ZED SDK without sl_hub, add the skip_hub option.
Installing SDK without Tools
To install the ZED SDK without any tools or samples, add the skip_tools option.
Setup CUDA
CUDA is an NVIDIA® library used by the ZED SDK to run fast AI and computer vision tasks on your graphics card. During the ZED SDK installation, if CUDA is not detected on your computer, the installer offers to download and install it for you.
Follow the steps below if you are installing CUDA manually.
-
Download and install CUDA from the CUDA Toolkit archive.
-
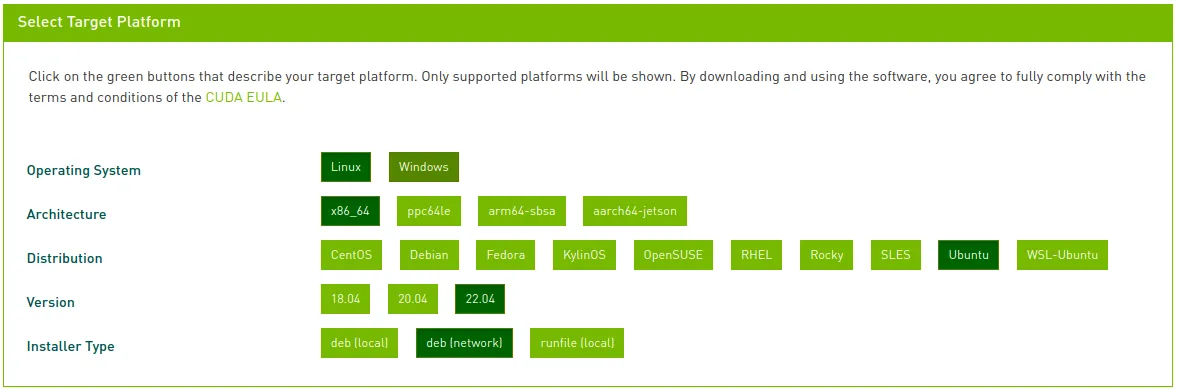
On the CUDA download page, select the following options. We recommend downloading a deb (network) version:
Linuxx86_64Ubuntu- your Ubuntu version (for example
24.04or22.04) deb (network)
-
Find out what Ubuntu release you are running by reading
/etc/lsb-release. -
Add the CUDA
aptrepository. -
Update the
aptrepository cache. -
Install CUDA. We recommend specifying the exact CUDA version you’re installing. The required CUDA version depends on the ZED SDK installer you downloaded, as recent releases are available for both CUDA 12 and CUDA 13; check the release page for the exact pairing.
Restart your computer
At the end of the installation, restart your system to make sure your paths are updated.
Upgrade the ZED SDK
To upgrade the ZED SDK, download the latest installer from the ZED SDK Download page and run it, as described in Download and Install the ZED SDK. There is no need to uninstall the previous version first: the installer replaces the installed version with the new one.
The same procedure also works to downgrade the ZED SDK: download the installer of the older version you need and run it. The installer replaces the currently installed version with the selected one.
For each minor release (for example, 5.0.x or 5.1.x), the ZED SDK Download page only offers the latest patch release. Patch releases fix bugs and issues found in the previous patch releases of the same minor version, so the latest one is always the recommended choice.
Uninstall the ZED SDK
The ZED SDK installer does not provide an uninstall script. To remove it, delete the installation folder:
If you installed the Python API, you can also remove it with:
CUDA is installed separately and is not removed together with the ZED SDK. If you no longer need it, remove the corresponding cuda-XX-X packages with apt.