

Setting up the ZED X One Core for Monocular Vision
This guide explains how to set up a ZED X One Core camera for monocular vision on an NVIDIA® Jetson™ platform and use it to retrieve image and inertial data.
The ZED X One Core streams MIPI CSI-2 and requires a ZED Link MIPI capture card. If you are using a GMSL2 ZED X One GS or ZED X One 4K, follow Setting up the ZED X One for Monocular Vision instead.
Install the ZED Link MIPI driver
Important: This procedure is valid only for an NVIDIA® Jetson AGX Orin™ Developer Kit equipped with a ZED Link MIPI Quad capture card. Support for the NVIDIA® Jetson AGX Thor™ with Holoscan Sensor Bridge is currently in beta: refer to the dedicated setup guide.
The ZED X One Core requires a ZED Link MIPI driver to operate correctly. This driver configures the MIPI capture pipeline of the card and of the connected cameras, and it is distributed separately from the GMSL2 ZED Link driver.
The GMSL2 ZED Link driver and the ZED Link MIPI driver are not interchangeable. Installing the wrong one leaves the capture pipeline unconfigured and no camera is detected.
Download the package matching your capture card and your Jetson™ Linux (L4T) version from the ZED X Camera Drivers page, install it with dpkg, and reboot the Developer Kit.
If the ZED Link MIPI package is not yet listed on the drivers page for your L4T version, please contact support@stereolabs.com.
The full assembly and driver installation procedure is described in the ZED Link MIPI Quad on AGX Orin setup guide.
The ZED X One Core does not support hot-plugging. Cameras must be connected and disconnected only when the host is powered off, and any change to the hardware configuration requires a full reboot of the host to take effect.
For troubleshooting, refer to the MIPI Troubleshooting guide.
Focus the lens (custom optics only)
A ZED X One Core purchased with optics is factory focused, so this step can be skipped: the camera is ready to use as it is.
Focusing is only required on a camera purchased without optics, on which you mount your own lens. Mount the camera in its final position, open a live preview with ZED_Explorer or ZED_Studio, and adjust the lens until the image is sharp at the working distance of your application. Lock the lens in place once focus is correct: any later movement of the optics invalidates the calibration.
Use the ZED X One Core with the ZED SDK
Once the capture card driver is installed, the ZED X One Core is handled by the ZED SDK like any other ZED X One camera. The SDK includes built-in support for data acquisition from a single camera through the sl::CameraOne class, allowing you to open and manage the camera directly without relying on external tools.
Install the ZED SDK
The ZED SDK enables processing of image data from the ZED X One Core in monocular mode. The sl::CameraOne class provides the core functionality to retrieve raw and rectified images, as well as inertial data from the integrated BMI088 IMU.
To get started, download and install the ZED SDK on your NVIDIA® Jetson™ platform.
Verify that the cameras are enumerated, with ZED_Explorer or ZED_Studio:
Sample code to open and use the ZED X One Core for monocular vision
For more details on using the ZED SDK with monocular cameras, refer to the ZED SDK API documentation.
Use the ZED X One Core with NVIDIA® Libargus Camera API
The camera can be opened using the Libargus Camera API, the API provided by NVIDIA® on Jetson™ to open cameras connected via CSI.
Make sure the multimedia API is installed:
Then compile the camera sample:
Use the ZED X One Core with ROS 2
The ZED ROS 2 wrapper supports monocular ZED X One Core data publishing.
When launching the ZED ROS 2 node, set the camera_model parameter to zedxonecore:
For more details on using the ZED ROS 2 wrapper, refer to the ZED ROS 2 documentation.
Calibrate the ZED X One Core for monocular vision
ZED X One Core cameras purchased with optics are factory calibrated, and no further action is required to retrieve undistorted, metrically accurate images. You need to calibrate the camera yourself only in custom configurations:
- the camera was purchased without optics and you install your own custom lens;
- the lens is replaced, refocused, or moved in any way;
- the camera is used in conditions that alter its optical behavior, such as underwater or behind a glass that acts as an additional lens.
In these cases, you can calibrate the camera with the open source zed-opencv-calibration tools. The zed_mono_calibration tool computes the camera’s intrinsic parameters (focal length, principal point, and distortion coefficients) from multiple views of a checkerboard pattern.
Prerequisites
- ZED SDK v5.5 or later
- OpenCV 4.x
- CUDA (compatible with your ZED SDK version)
- OpenGL libraries (GLEW, FreeGLUT)
- CMake 3.5+ and a C++17 compiler
- A printed checkerboard pattern with known square size and inner-edge counts
- A focused and mechanically locked lens
Build the calibration tools
Run the calibration
If you don’t know the serial number or ID of your camera, list the connected devices with:
Then launch the calibration tool:
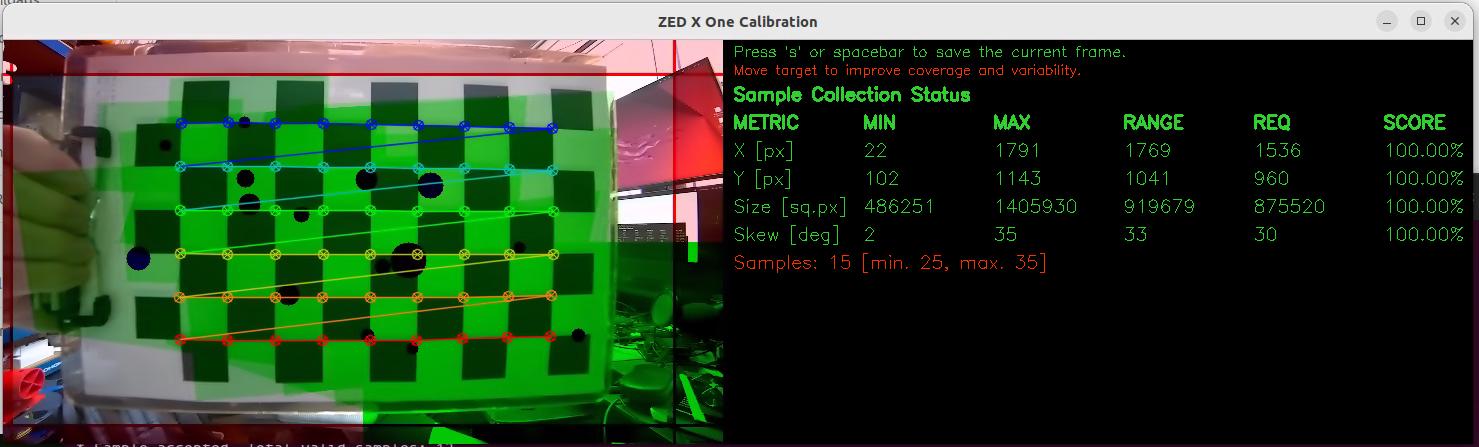
The tool accepts the following parameters:
Use --fisheye with the fisheye lens option of the ZED X One Core. The wide and narrow lens options use the default pinhole model.
For example, to calibrate a fisheye lens using a 12×9 checkerboard with 30 mm squares:
The calibration runs in two phases:
- Data acquisition: Move the checkerboard in front of the camera and press Spacebar or S to capture each frame. The tool enforces quality checks (sharpness, diversity) and provides real-time feedback on X/Y coverage, size range, and skew.
- Calibration computation: Computation triggers automatically once all metrics reach 100% with the minimum number of samples, or when the maximum sample count is reached.
When complete, the tool writes two files:
mono_calibration_SN<serial_number>.yml: OpenCV format containing the camera matrix (K) and distortion coefficients.SN<serial_number>_mono.conf: ZED-compatible format covering all supported resolutions.
To let the ZED SDK use your calibration automatically for the corresponding camera, copy the generated .conf file into the settings folder of your ZED SDK installation:
- Linux:
/usr/local/zed/settings/
The file must be renamed to follow the SNxxxxxxxx.conf convention, where xxxxxxxx is the camera serial number (for example, SN10025660.conf).
On Windows, a ZED X One Core camera cannot be connected and used directly, since the MIPI CSI-2 interface requires an NVIDIA® Jetson™ platform. You can still work with ZED X One Core data on Windows by playing back SVO2 recordings or by receiving a local network stream from a Jetson™ device. The streaming workflow, which applies to a single camera as well as to a stereo rig, is described in Developing with ZED X One Core on a PC. In these cases the .conf calibration file must be copied manually into the C:\ProgramData\StereoLabs\settings\ folder, following the SNxxxxxxxx.conf naming convention described above.
Validate the calibration with zed_mono_checker
After calibrating, use the zed_mono_checker tool to verify the result. It measures the reprojection error in real time against the detected checkerboard corners, giving you immediate feedback on calibration quality.
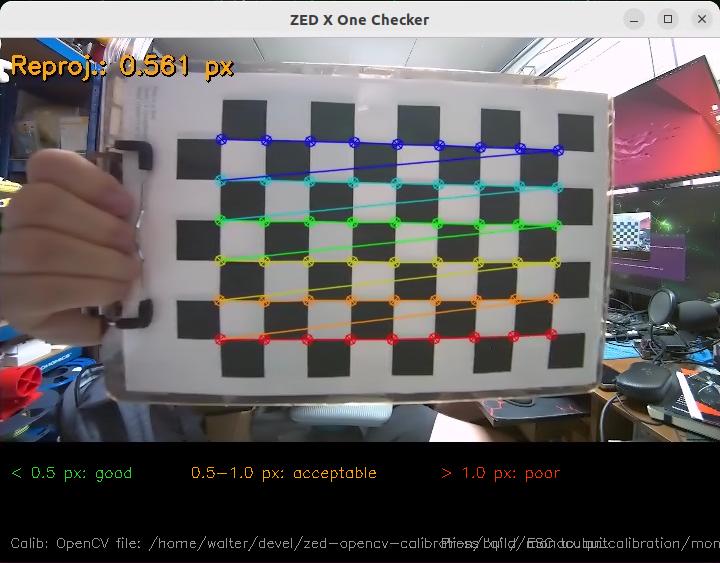
By default, the checker uses the camera’s internal calibration. To validate a specific calibration file, pass it with --calib_opencv:
The checker accepts the same camera, checkerboard, and lens parameters as the calibration tool, plus:
The reprojection error is displayed and color-coded:
- Green: below 0.5 px (good)
- Orange: 0.5–1.0 px (acceptable)
- Red: above 1.0 px (poor; recalibration recommended)
If the error is consistently in the red range, check that the lens is still firmly locked, then run zed_mono_calibration again, taking care to cover the full field of view with diverse checkerboard poses.