

Tutorial - Object Detection with Isaac™ ROS
This tutorial explains how to detect objects in the images of a ZED camera with the Isaac™ ROS 5 object detection packages, accelerated with TensorRT. The example supports two models:
- RT-DETR (default): the NVIDIA® SyntheticaDETR
sdetr_graspmodel, trained on synthetic data to detect objects that a robot arm can grasp. - YOLOv8: an Ultralytics YOLOv8 model, trained by default on the 80 classes of the COCO dataset (people, vehicles, animals, everyday objects).
The example is designed for the monocular ZED X One cameras, which do not provide depth and cannot use the Object Detection module of the ZED SDK. It works with all the ZED cameras: with stereo cameras, the objects are detected in the left image.
The image stays in GPU memory from the ZED SDK to the TensorRT inference, thanks to the CUDA zero-copy transport. Read that page first for an introduction to how the transport works.
The detection pipeline
The example chains the ZED node, the Isaac™ ROS image and tensor processing nodes, the TensorRT node, and the decoder of the selected model. A small Python node then maps the detections back to the ZED image.
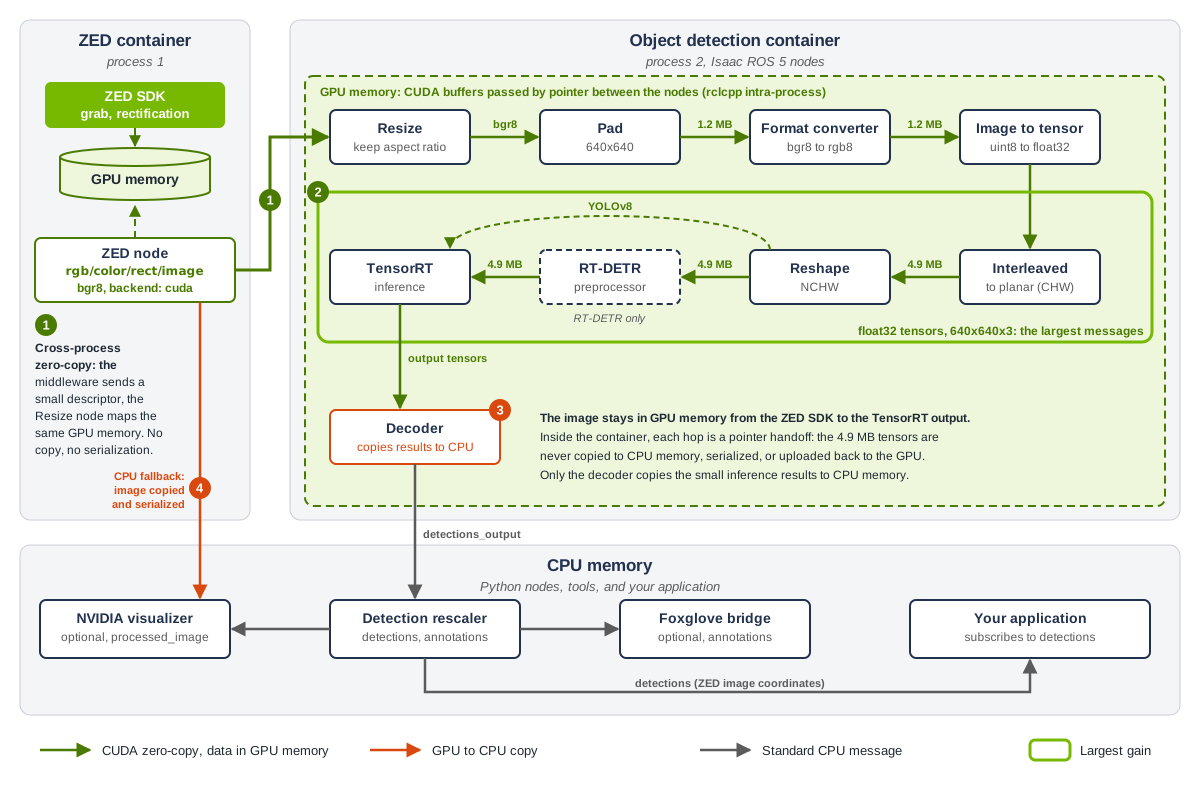
Figure 1: the object detection pipeline. Green arrows carry data in GPU memory, orange arrows mark the copies from GPU to CPU memory.
The image is converted to the input tensor of the network in several steps, all on the GPU:
- Resize: scales the ZED image to fit in 640x640, keeping its aspect ratio.
- Pad: adds black pixels on the bottom and on the right side, to obtain a 640x640 image.
- Format converter: converts the
bgr8image torgb8. - Image to tensor: converts the pixels to
float32values, in [0, 1] for YOLOv8 and in [0, 255] for RT-DETR. - Interleaved to planar and Reshape: reorder the tensor in the
NCHWlayout expected by the network. - RT-DETR preprocessor (RT-DETR only): adds the size of the input image, a second input of the RT-DETR network.
The TensorRT node runs the inference, and the decoder of the selected model converts the output tensors into a vision_msgs/Detection2DArray message, in the coordinates of the 640x640 network image. The detection rescaler maps the detections back to the coordinates of the ZED image, and publishes them with the Foxglove annotations.
Where the CUDA zero-copy transport makes the difference
The numbers below match the badges of Figure 1.
- From the ZED node to the Isaac™ ROS nodes (cross-process). The ZED node and the Isaac™ ROS nodes run in two different processes. With the
cudabuffer backend, the middleware sends only a small descriptor of the GPU memory where the ZED SDK wrote the image, and the Resize node reads the same memory. Without it, the ZED node copies every image to CPU memory, the middleware serializes and transfers the full image, and the Resize node uploads it back to the GPU. - Between the Isaac™ ROS nodes (intra-process). The Isaac™ ROS nodes run in the same container and exchange their messages with rclcpp Intra-Process Communication: each node passes a pointer to its output message, whose
rosidl::Bufferstays in GPU memory. This is where the pipeline handles its largest messages: eachfloat32tensor of 640x640x3 values is 4.9 MB, about four times the size of the 640x640rgb8image, and it crosses three or four nodes before the inference. These tensors are never copied to CPU memory nor serialized. - The decoder is the first node that copies data to CPU memory: only the output tensors of the network (a few KB for RT-DETR, 2.8 MB for YOLOv8), to filter and decode the detections on the CPU. From this point, the messages are small
Detection2DArraymessages. - The NVIDIA® visualizer is a Python node that reads the ZED image in CPU memory. The ZED node automatically sends it a CPU copy of the image, while the Resize node keeps receiving the GPU memory. This copy has a cost for each image: disable the visualizer with
visualizer:=falsewhen you do not need it.
The other CPU subscribers of the ZED topics, such as RViz2, ros2 bag, and the Foxglove bridge, are served the same way as the visualizer, without affecting the zero-copy path of the Isaac™ ROS nodes.
Without the cuda_buffer_backend plugin, the example still works: the ZED node publishes the images in CPU memory, and the Resize node uploads them to the GPU. The ZED node reports the transport in use at startup, for example * Buffer transport: CUDA zero-copy.
Requirements
- An Isaac™ ROS 5 environment with ZED support, in Docker or in Bare Metal mode, set up by following the Setting up Isaac™ ROS 5 and Use ZED with Isaac™ ROS guides.
- The
rmw_fastrtps_cpp(Fast DDS, default) or thermw_zenoh_cppv0.10.5 or newer (Zenoh) ROS 2 middleware, as described in Middleware requirement. - The ZED ROS 2 Wrapper v5.6.0 or newer, with the CUDA zero-copy transport set up as described in Set up the CUDA zero-copy transport: the
cuda_bufferpackage installed, thecuda_buffer_backendplugin built from source, and the wrapper rebuilt.
Use Fast DDS to run this example. With Zenoh (rmw_zenoh_cpp v0.10.5), the detections can stop after a few seconds or a few minutes, without any error: the ZED node keeps publishing the images, but the detection nodes no longer receive them. The issue happens with both the CUDA zero-copy and the CPU transports, and it is under investigation. The CUDA zero-copy examples are not affected.
Set up the example
Run all the commands in the Isaac™ ROS environment. With the Docker installation, run isaac-ros activate to open a shell in the running container: the workspace ${ISAAC_ROS_WS} of the host is mounted in the container, so the source code, the build artifacts, and the models persist across container restarts.
Get the source code
If the ZED ROS 2 Examples are not in your workspace yet, clone them in the src folder, next to the ZED ROS 2 Wrapper:
Install the dependencies
The example uses the Isaac™ ROS image processing, tensor processing, TensorRT, RT-DETR, and YOLOv8 packages, vision_msgs, foxglove_msgs, the tool to download the RT-DETR model, and the optional Foxglove bridge.
Docker
Bare Metal
The packages installed with apt-get in the container are lost when the container is removed, for example after rebuilding the image with isaac-ros activate --build-local. Add them to a custom image layer, as you did for the ZED SDK:
-
On the host, create the
${ISAAC_ROS_WS}/docker/Dockerfile.01-zed_object_detectionfile: -
Add the
01-zed_object_detectionimage key to the${ISAAC_ROS_WS}/.isaac-ros-cli/config.yamlfile:The Isaac™ ROS CLI builds the custom layers in the alphabetical order of their image keys: the
01-prefix builds the object detection layer on top of the00-zed_sdklayer, which is not built again. See the note about the build order. The Isaac™ ROS TensorRT packages install the full CUDA toolkit: on Jetson™, the image grows from about 11 GB to about 30 GB. -
Exit all the shells of the running container, then rebuild the image and start the container:
Install the models
The models are stored in the ${ISAAC_ROS_WS}/isaac_ros_assets/models folder, which persists across container restarts with the Docker installation.
The TensorRT engine file (.plan) is optimized for the GPU and the TensorRT version of the device where it is generated: generate it on the device that runs the example, and generate it again after a JetPack or TensorRT upgrade.
RT-DETR
Download the SyntheticaDETR sdetr_grasp model from NVIDIA® NGC and generate its TensorRT engine. The script asks you to accept the model license (EULA):
The model is saved in the ${ISAAC_ROS_WS}/isaac_ros_assets/models/synthetica_detr/ folder. The engine generation takes about 2 minutes on a Jetson™ AGX Orin.
YOLOv8 (optional)
Export a YOLOv8 model to ONNX with the Ultralytics Python package. The following commands export the yolov8s model, trained on the COCO dataset, in a dedicated Python virtual environment:
The virtual environment keeps the Ultralytics packages and their dependencies, such as PyTorch and OpenCV, out of the system Python. This is important with the Bare Metal installation, where they could replace the versions required by Isaac™ ROS.
The TensorRT engine yolov8s.plan is generated automatically from yolov8s.onnx the first time you start the example with model:=yolov8, which takes about 2 minutes on a Jetson™ AGX Orin. You can also generate it in advance:
The Ultralytics YOLOv8 models are released under the AGPL-3.0 license. Check that it is compatible with your application, or use the RT-DETR model.
Build the example
Run source ${ISAAC_ROS_WS}/install/local_setup.bash in every new shell. With the Docker installation, run isaac-ros activate first in every new terminal.
Run the example
Start the example with the RT-DETR model, replacing <camera_model> with the model of your camera, for example zedxonegs, zedxone4k, zedxm, or zed2i:
Start the example with the YOLOv8 model:
The detections are published when the TensorRT node logs TensorRT Node initialized successfully.
The sdetr_grasp RT-DETR model only detects the objects listed in its model card, and its default confidence threshold is high (0.9). If no object is detected, place one of these objects in front of the camera, or lower the threshold, for example with confidence_threshold:=0.6. To test the example with common objects, such as people, use the YOLOv8 model.
When you stop the example with Ctrl+C, the object detection container can end with process has died [...] exit code -11, or ros2 launch can stop it with SIGKILL after failed to terminate ... escalating. This is a known shutdown issue of the Isaac™ ROS 5.0 nodes, which crash while the container unloads them, and it has no effect on the detections. The NVIDIA® visualizer can also print a Traceback when it stops.
Launch arguments
To use your own YOLOv8 model, set model_file_path and engine_file_path, and num_classes if the model is not trained on the COCO dataset. The visualizers display the COCO class names.
Topics
All the topics of the example are in the /zed_isaac/object_detection namespace:
The class ID of each detection is in results[0].hypothesis.class_id, and its confidence in results[0].hypothesis.score.
Visualize the detections
NVIDIA® visualizer
With visualizer:=true (default), the NVIDIA® visualizer of the selected model draws the detections over the ZED image and publishes the result on the /zed_isaac/object_detection/processed_image topic. Display it with rqt_image_view:
RT-DETR
YOLOv8
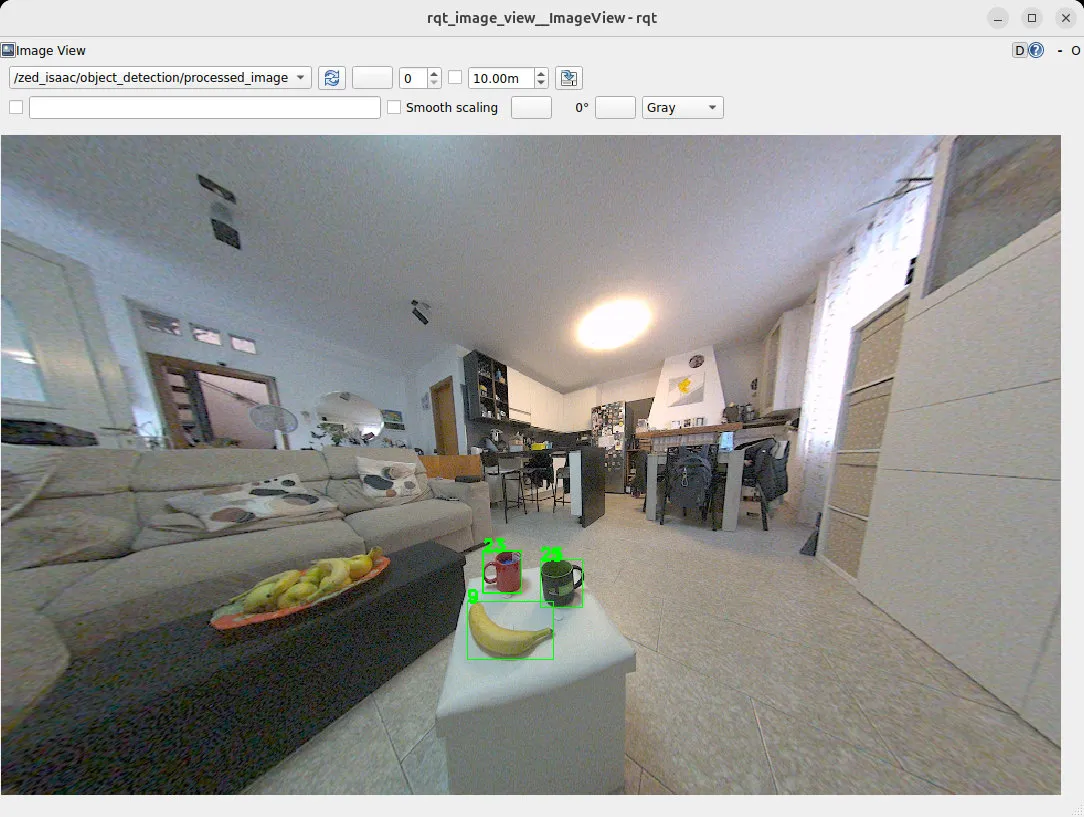
Figure 2: the RT-DETR detections drawn by the NVIDIA® visualizer, captured with a ZED X One S equipped with a fisheye lens. The labels show the class IDs of the sdetr_grasp model.
The visualizer processes the images in CPU memory, as shown in Figure 1: set visualizer:=false to save CPU resources when you do not need it.
Foxglove
Start the example with the Foxglove bridge:
Then, in Foxglove:
- Open a connection to
ws://<device_ip>:8765, where<device_ip>is the IP address of the device running the example. The Isaac™ ROS container uses the network of the host, so the address is the same with the Docker installation. - Import the layout file
foxglove/zed_isaac_ros_object_detection.jsonof the example, from the layouts menu, with the Import from file… button.
The layout displays the compressed ZED image with the bounding boxes and the labels of the annotations topic, the 640x640 network image, and the content of the detections topic. Foxglove draws the annotations, so the images are not processed in the ROS 2 graph.
RT-DETR
YOLOv8
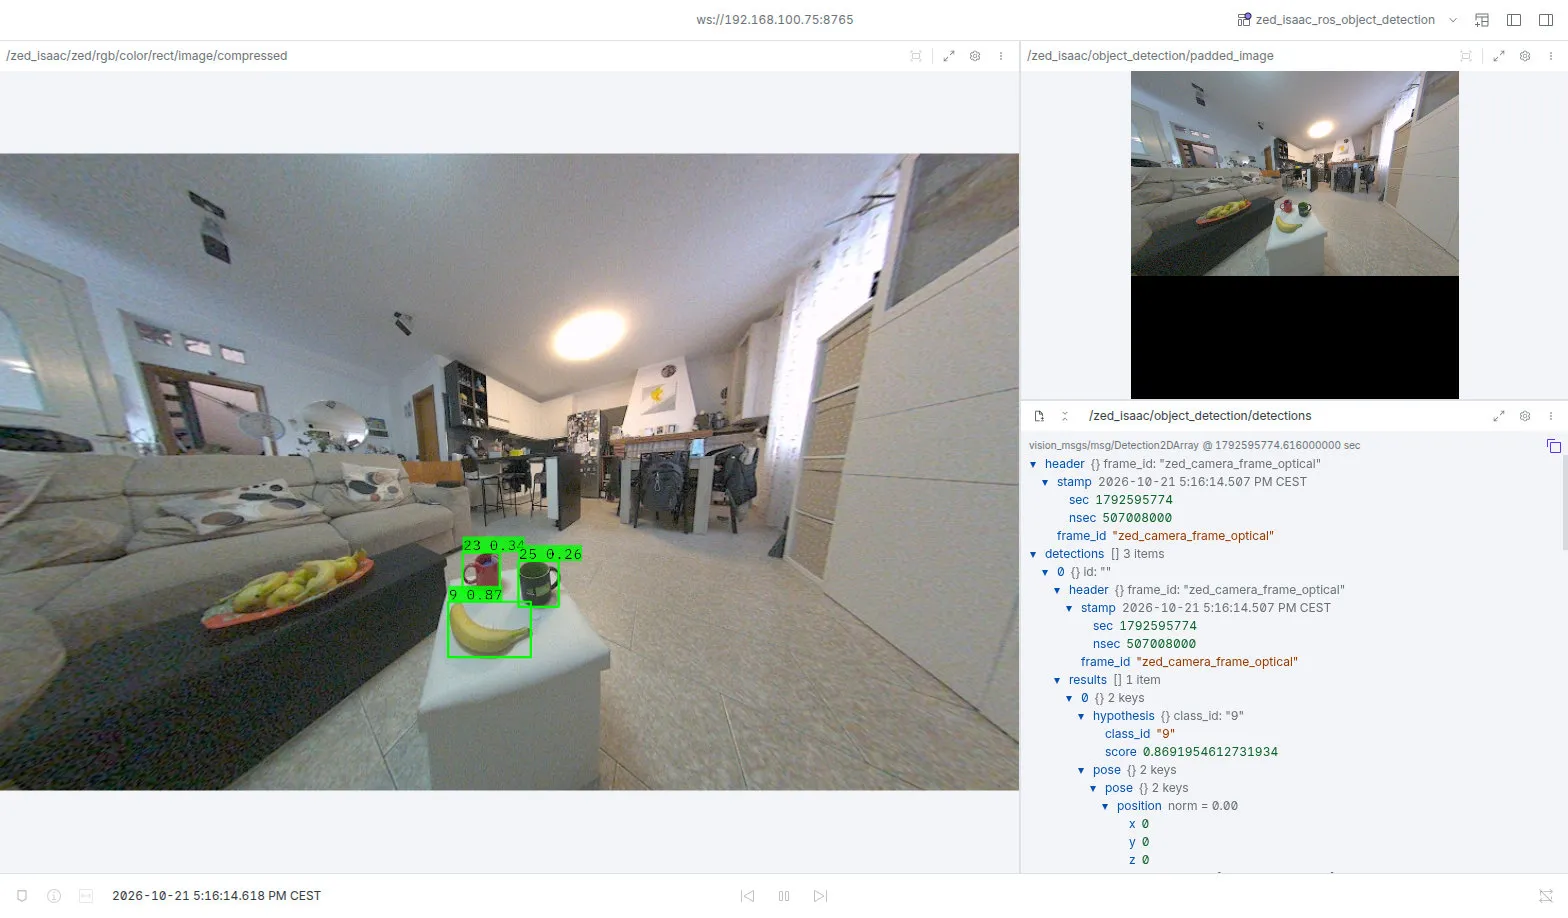
Figure 4: the RT-DETR detections in Foxglove, captured with a ZED X One S equipped with a fisheye lens. Left: the ZED image with the annotations, labeled with the class IDs and the confidences. Right: the padded 640x640 network image and the detections topic.
The launch file explained
The launch file is located in the folder launch and is named zed_isaac_ros_object_detection.launch.py. These are the parts that matter for the CUDA zero-copy transport.
ZED camera parameters
The file config/zed_params.yaml overrides the parameters of the ZED node:
buffer_backend: 'cuda'publishes the images with the CUDA zero-copy transport.enable_24bit_output: truepublishesbgr8images, the format expected by the Isaac™ ROS image processing nodes, instead ofbgra8.pub_downscale_factor: 2.0halves the size of the published images: they are resized to 640x640 before the inference anyway.depth_mode: 'NONE'disables the depth processing of the stereo cameras, not used by the example, to save GPU resources.
Two component containers
The ZED node runs in the /zed_isaac/zed_container component container, and the Isaac™ ROS nodes in the /zed_isaac/object_detection/object_detection_container component container:
- In the object detection container, the Isaac™ ROS nodes exchange their CUDA buffers with rclcpp Intra-Process Communication, enabled by each Isaac™ ROS node on its publishers and subscriptions.
- Between the two containers, the
cudabuffer backend shares the ZED images through CUDA IPC (inter-process communication), still without copies.
The serialize_buffer_with_endpoint and deserialize_buffer_with_endpoint loggers of the ROS 2 buffer typesupport print several INFO lines for each CUDA buffer message, thousands of lines per minute. The containers raise their level to WARN to keep the log readable.
The Isaac™ ROS ResizeNode, which receives the ZED images, is configured with input_qos_depth: 1 (subscription queue) and input_queue_size: 1 (image and camera info synchronization queue), so that it always takes the latest image. The cuda buffer backend can reuse the GPU memory of an image about 100 ms after it is published, so an image taken late from a longer queue could no longer be read. The same applies to every Isaac™ ROS node that receives CUDA buffers. See the warning about the queue depth in the CUDA zero-copy tutorial.
Keep the ZED node and the Isaac™ ROS nodes in two different containers. With cuda_buffer_backend 0.1.2, the same-process path can deliver an image buffer that the ZED node has already reused for a new image: the backend drops it, the Isaac™ ROS node receives an empty buffer, and the container stops. The queue depth of 1 does not prevent this error when the nodes share the ZED container.
We tested both layouts on a Jetson™ AGX Orin, alternating the two models, with the Docker and the Bare Metal installations:
With two containers, the detections are published at 30 Hz with both models.
The ZED node is started with IPC disabled:
rclcpp Intra-Process Communication delivers the messages without the buffer backend negotiation, so the ZED node publishes CPU data when an intra-process subscriber is connected. With IPC disabled, the ZED node always publishes CUDA buffers to the subscribers that accept them.
Image encoding
The Resize node subscribes directly to the ZED rectified image, and the Pad node to the output of the Resize node. The image is resized keeping its aspect ratio, then padded on the bottom and on the right side, as in the NVIDIA® RT-DETR pipeline:
Because the padding is only on the bottom and on the right side, the detections in the network image are mapped back to the ZED image with a single scale factor for each axis. The zed_detection_rescaler Python node computes it from the size of the ZED image in the camera_info topic, with the same computation as the Resize node.
Model selection
The model argument selects the configuration of the TensorRT node and the model-specific nodes:
- RT-DETR: the Reshape node publishes the tensor to the RT-DETR preprocessor, which adds the size of the input image as a second tensor, then the RT-DETR decoder converts the output tensors into detections. The image tensor keeps the pixel values in [0, 255].
- YOLOv8: the Reshape node publishes the tensor directly to the TensorRT node, and the YOLOv8 decoder applies the Non-Maximum Suppression. The image tensor is scaled to [0, 1].
Troubleshooting
- No detection is published: check that all the terminals use the same supported middleware, as described in Middleware requirement. With the RT-DETR model, also read the tip in Run the example.
- The example stops with
Neither the TensorRT engine file ... nor the ONNX model file ... exist: install the model as described in Install the models, or set themodel_file_pathandengine_file_pathlaunch arguments. - The example stops with
The ISAAC_ROS_WS environment variable is not set: setISAAC_ROS_WSto the path of your Isaac™ ROS workspace, as described in Create the Isaac™ ROS workspace. - The ZED node opens another camera or another SVO file, or fails with
INVALID SVO FILEwhile the file is valid: another device on the same network runs the example. The component containers of the two devices have the same names, soros2 launchcan load the nodes in the containers of the other device. Set a differentROS_DOMAIN_IDon each device, for exampleexport ROS_DOMAIN_ID=11, in all the terminals of the device. - TensorRT reports an error while loading the engine file: the engine was generated on another device or with another TensorRT version. Regenerate it with
force_engine_update:=true. - The NVIDIA® visualizer stops with
ImportError: numpy.core.multiarray failed to import: a NumPy 2 version installed withpipin your user folder (~/.local/lib/python3.12/site-packages) replaces the NumPy 1 version used bycv_bridge. Check it withpython3 -c "import numpy; print(numpy.__version__, numpy.__file__)", then remove the user version withpip uninstall numpy, or start the example with thePYTHONNOUSERSITE=1environment variable to ignore the user Python packages.
Conclusion
This tutorial showed how to detect objects in the ZED images with the Isaac™ ROS 5 RT-DETR and YOLOv8 packages. With the CUDA zero-copy transport, the image goes from the ZED SDK to the TensorRT inference without leaving the GPU memory: the ZED node shares it with the Isaac™ ROS nodes as a small descriptor, and the Isaac™ ROS nodes pass their image and tensor buffers by pointer. Only the inference results, and the images requested by CPU subscribers, are copied to CPU memory.
To process the ZED data in GPU memory in your own nodes, follow the CUDA zero-copy image tutorial.